Monetizing your WordPress site is a powerful way to generate revenue from premium content, such as videos, PDFs, or exclusive articles. One effective method to achieve this is by implementing a paywall, and the Paywall for WooCommerce plugin makes this process seamless and efficient. In this blog post, I’ll guide you step by step to set up a paywall product on your WordPress site using our plugin, available on CodeCanyon: Paywall for WooCommerce. Whether you’re a blogger, course creator, or e-commerce store owner, this plugin can help you restrict access to premium content and boost your revenue.
Why Use a Paywall in WooCommerce?
Adding a paywall to your WooCommerce store allows you to:
- Monetize premium content: Charge for access to exclusive videos, tutorials, or digital downloads.
- Increase revenue: Turn free content into a revenue stream by offering paid access.
- Build customer loyalty: Create a sense of exclusivity with members-only content.
- Flexible content delivery: Use teasers to attract users and reveal full content post-purchase.
Unlike other monetization methods, such as ads, which can degrade user experience, a paywall is quick to set up and provides immediate value to your audience.
Follow these steps to add a paywall to your WordPress site using the Paywall for WooCommerce plugin.
Step 1: Install and Activate the Plugin
- Purchase and Download: Buy the Paywall for WooCommerce plugin from CodeCanyon. Download the .zip file from your CodeCanyon account.
- Upload to WordPress: Log in to your WordPress admin dashboard. Navigate to Plugins > Add New > Upload Plugin. Click the Choose File button, select the downloaded .zip file, and click Install Now.
- Activate the Plugin: Once installed, click Activate to enable the plugin. A new section titled “Paywall for WooCommerce” will appear in your WooCommerce settings.
Step 2: Configure Global Paywall Settings
- Access Settings:Go to WooCommerce > Settings > Paywall for WooCommerce tab in your WordPress admin dashboard.
- Set Global Expiration: Define the default expiration period for paywall products. For example, set it to 30 days to grant access for a month after purchase. A zero value means no expiration.
- Enable Expiration Display:
- Check Show default expiration at checkout to display the expiration period on the checkout page.
- Check Show custom expiration on single product pages to show product-specific expiration details before purchase.
- Redirect Options: Choose whether to redirect users to the cart or checkout page after adding a paywall product to the cart. For stores primarily selling paywall products, redirecting to checkout is recommended.
- Save Changes: Click Save Changes to apply your global settings.

Note: Expiration settings apply only to registered users. Guest customers retain access until their WooCommerce session expires.
Step 3: Create a Paywall Product
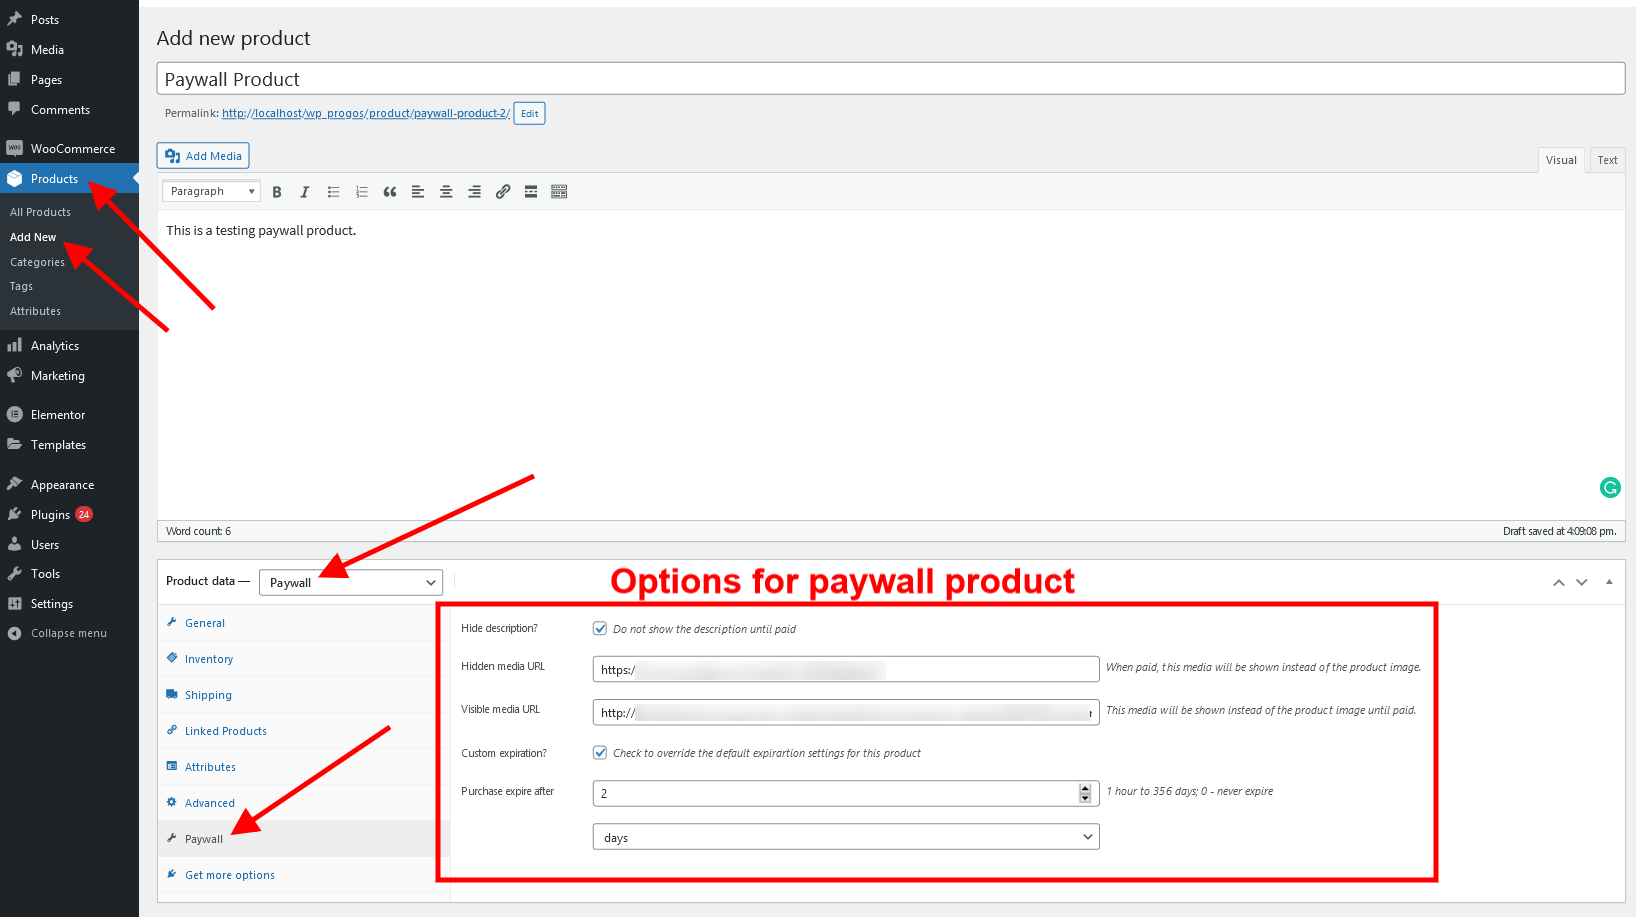
- Add a New Product: Navigate to Products > Add New in your WordPress admin dashboard.
- Select Paywall Product Type: In the Product data section, choose Paywall from the dropdown menu.
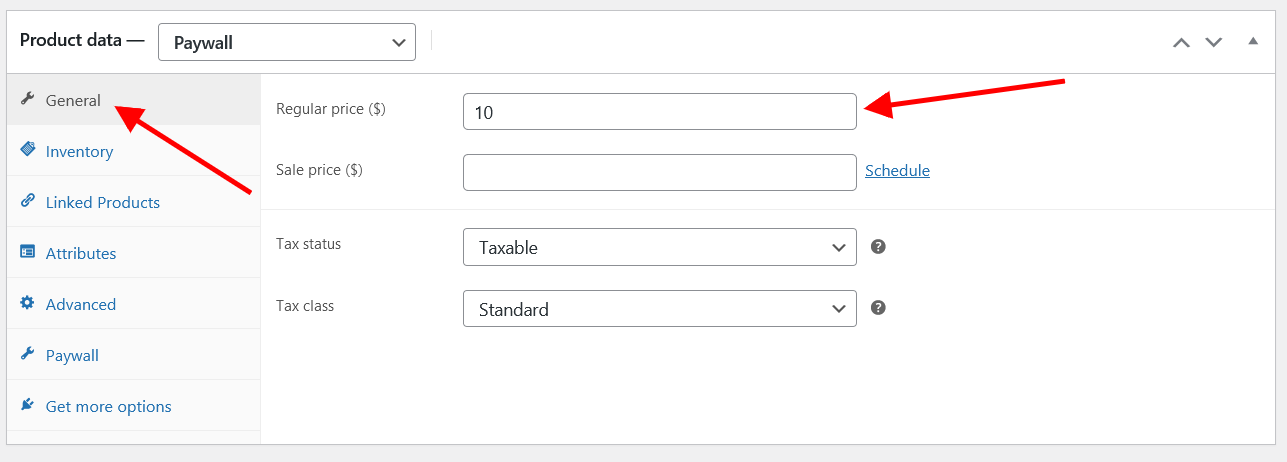
- Set General Details:
- Enter the product name, price, and short description (visible to all users).
- Optionally, add a teaser in the short description to entice users to purchase.
- Configure Paywall Settings: Click the Paywall tab in the product data section and set the following:
- Hide description: Check this box to hide the full product description until the product is purchased.
- Visible media URL: Enter a URL for teaser content (e.g., a YouTube trailer, a watermarked image, or the first page of a PDF) that users can see before purchase.
- Hidden media URL: Enter the URL for premium content (e.g., a full YouTube video, a high-resolution image, or a PDF) that users can access after purchase.
- Custom expiration: Override the global expiration period for this specific product, if needed.
- Publish the Product: Click Publish to make the paywall product live on your store.
Step 4: Enhance with Shortcodes (Optional)
For advanced customization, use the [paywall_add_to_cart] shortcode to add the paywall product’s “Add to Cart” button on the single product page on your site, such as in Elementor Pro or other page builders. This is ideal for creating custom landing pages or integrating paywall products into specific sections of your site.
[woopaywall_show_after_purchase] shortcode allows you to hide a part of the content (short or full description, for instance) and show it only with the client who purchased the product.
[woopaywall_show_after_purchase]

The content placed here is hidden until paid.

[/woopaywall_show_after_purchase]
You can use the [woopaywall_show_before_purchase] shortcode to hide some parts of the content that have no value after the purchase.
[woopaywall_show_before_purchase]

The content placed here is shown only until paid.

Hey, here is a sales pitch! You definitely must buy this NOW!

[/woopaywall_show_before_purchase]
Step 5: Test the Paywall
- Preview the Product: Visit the product page as a non-logged-in user to ensure the visible media URL or teaser content displays correctly.
- Test Purchase Flow: Log in as a test user, add the paywall product to the cart, and complete the purchase using a test payment gateway (e.g., WooCommerce’s “Fake Payments gateway” for testing).
- Verify Content Access: After purchase, confirm that the hidden media URL or full description is accessible. Check that the content reverts to restricted access after the expiration period (if set).
Note: The plugin does not prevent customers from downloading, copying, or sharing content after purchase. If content protection is a concern, consider additional security measures or contact the plugin’s support team for customization options.
Best Practices for Using Paywall for WooCommerce
- Create Compelling Teasers: Use the visible media URL or short description to showcase a preview of your premium content, encouraging purchases.
- Set Appropriate Expiration: Balance access duration with value. For example, a short expiration (e.g., 7 days) works for time-sensitive content, while a longer or no expiration suits evergreen content.
- Leverage Media Variety: Use YouTube or Vimeo for videos, direct URLs for audio or PDFs, or high-resolution images to diversify your offerings.
- Test with a Demo: Try the plugin on the demo site to explore its features before implementing it on your live site.
Limitations to Understand
- Content Sharing: The plugin does not include built-in measures to prevent content duplication or sharing after purchase.
- Single Purchase Restriction: Logged-in users can purchase each paywall product only once until access expires. After expiration, they can repurchase.
- Virtual Products: Paywall products are virtual, do not support stock management, and allow only one item per cart with AJAX add-to-cart disabled.
Conclusion
Adding a paywall to your WordPress site with Paywall for WooCommerce is a quick and effective way to monetize your premium content. By following the steps outlined above, you can set up a paywall, create exclusive products, and start generating revenue in minutes. Whether you’re offering videos, documents, or high-resolution images, this plugin provides the flexibility and ease of use to enhance your monetization strategy.
Read more articles about this plugin here: Paywall
Ready to transform your WooCommerce store?
Unlock the full potential of your content with Paywall for WooCommerce—the best paywall for WordPress—and build a loyal, paying audience today!
Get the Paywall for WooCommerce Plugin Now
Trusted by people | Clean code | Frequent updates | Quick support
Progos Tech is a reliable WordPress Plugins development company which offers valuable add-ons, custom eCommerce development services, and you can hire its Certified Developers.
As an expert WordPress eCommerce agency, we designed our firm with the idea of delivering the finest services in almost every field of eCommerce development. We have confidence in our WordPress and WooCommerce development services and have served to hundreds of satisfied customers.
Progos Tech specializes in leveraging the WordPress e-commerce solution for driving more revenue and offering an advanced and enhanced customer experience.
Request a Custom Quote
Schedule a call with us to discuss your requirement. Our team will understand your needs to the best of their ability to boost your business sales.